Steps to Making Copper Leaves:1. Cutting the Copper Sheeting I get a lot of the copper sheeting I use for the leaf ornaments from the recycling center. I will either hand cut the copper for simpler shapes like the magnolias, but I will draw fern and other complicated shapes on the computer and laser cut them for detail. 2. Annealing The annealing process allows me to shape the metal and make it stronger. In order to anneal it, I will heat it up with a torch to get it red hot. Then, I will quench it in water in order to handle it and shape it into the desired shape. 3. Hammering To get the textures and pattern I want, I use hand-carved molds to get the veins of different types of foliage. I will use a smaller, metal-working hammer to add divots to the leaves giving each ornament a lifelike texture. 4. Patina The final step is to give the leaves a more natural look. Though bright copper is pretty, I use a patina called liver of sulfur to darken the shiny surface and color the leaves in a more muted tone. Why I Use Copper Leaves:
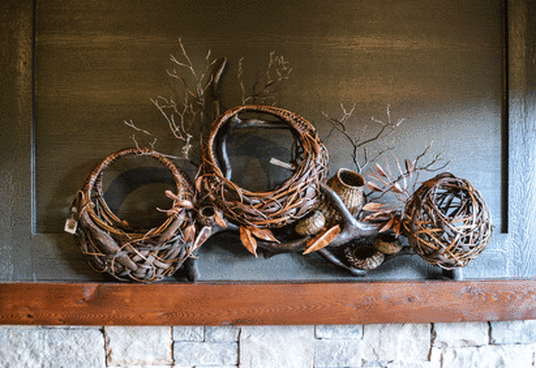 Fireplace mantel sculpture with handwoven baskets and copper magnolia leaves. Video Transcription: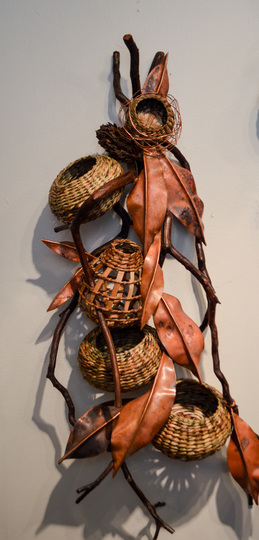 Copper magnolia leaves adorning a wall hanging sculpture. Copper magnolia leaves adorning a wall hanging sculpture. Hey there, it’s Matt Tommey here in Asheville’s River Arts District. One of the things I love to do is create wall hangings and being a basket maker, I never thought that I would work with metal. I love metal because it gives a different texture, shape and way the color hits a sculpture. It’s a great juxtaposition to the natural baskets that I make.
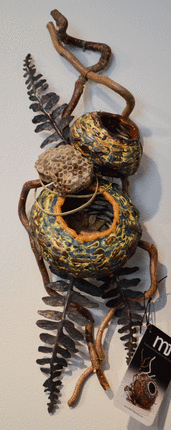
These baskets are made from iris foliage, if you can believe it, and covered in encaustic wax which gives them a fine coating as well as a nice sheen. In this wall hanging, which is going to be very simple, I really want to do a couple of things here that will come out from that like it’s in nature. One of the ways I do that is with copper leaves. People are always asking me: “How do you do that? How does a copper leaf start out?” It starts out with basic copper that I get at the recycling place. I get this in big sheets like old, copper gutters and flashing and things like that. I then take it and either hand cut it, or I draw it on the computer and laser cut it into forms like this. This is a pretty detailed one which I cut from one of my drawings of a fern leaf like the ones you would see in nature. So, what I’ve got to do now in order for this to be workable, is to take something that is pretty rigid which is this copper here, and do what’s called anneal it, which is basically taking the copper and making it red hot and turning it into taffy. Not quite like taffy, but really, really soft and flexible so that you can maneuver it, work it, hammer it, and make it into something beautiful. So let me show you how I’m going to do that. So what I am going to do is take this and put it over here on my stand and I will begin to turn it red hot. So this is turning it red hot, and I am just heating it up right now with a basic torch. You can see it will start to turn colors. Right now, it will start to turn red hot. I’ll do that all the way down the leaf, down into hear, getting everything really hot. It’s basically just changing the molecular structure of the copper. And now once it’s ready, don’t pick it up with your fingers. Ask me how I know that… I’ll have to tell you about that in another video. Take it like this, and I have just a little bucket of water in which I just quench it. Now I can take this, and you can see how flexible it is. What I do then, typically is put it in a mold. I have a number of different molds, like this one which has a groove in it. I’ll take a hammer and just hammer the leaf down into the mold to get the vein. I also have molds like this for my kudzu leaves that I have done over the years, and I’ll take that and put the copper in there and hammer it down to get that shape as well. Once the initial groove is put in, I’ll have something like this with the vein running down the center. And I love this, because it gives me the texture that I’m going for. So I will take a little hammer like this and hammer down the leaves. Each one of the leaves gets about fifteen to thirty strokes in order to get the nice texture that I want. Then, all I have to do is clean all that up and put on the patina to give the leaf a more natural look. I will add something called liver of sulfur to add more natural coloring. Then I will actually use this tail to actually fit the leaf into the basket that I am working on. I will show you in just a little bit how I finished this piece up. Thanks for watching how I make copper leaves for my baskets.
2 Comments
12/21/2021 02:40:40 am
Watched your leaf video - brilliant - loved your fern - well done - I am looking for copper leaves that I can have engraved and hung from memorial trees but finding it difficukt to buy blanks with the size I need and I cam across your website - You do beautiful work - well done
george
2/9/2023 01:31:54 am
i likey Leave a Reply. |
AuthorMatt Tommey is a sculptural basketry artist and basketry teacher working in East Texas. His work is commissioned and collected around the country. Archives
March 2024
Categories |
 RSS Feed